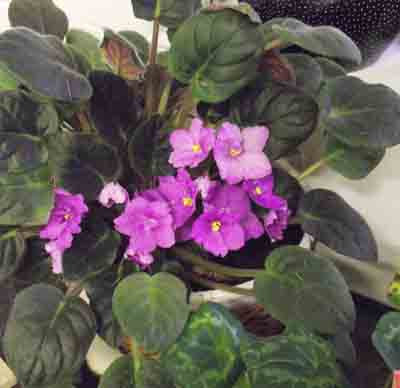
Most people think that it is easy to grow African violets from leaves.
The way most people do this is to pick a leaf off a plant and drop it into a glass or container of water and soon you will have roots. Yes this works sometimes but is not necessarily the best way to do things.
African violets can be propagated from leaves and also other parts of the mother plant. The leaf is however the best part of the plant to use when wanting to propagate a new plant.
What to do!
Select and pick the leaf on the mother plant that you want to use to propagate a new plant.
Don't pick any old leaf, you must select a suitable leaf to use. The best leaves on the plant are not the oldest ones, (the ones that are closest to the soil) or the youngest leaves on the plant. You should select a leaf that is neither too old or too young. The leaf should be healthy and clean. If you are planting a variegated leaf African violet you should look for a leaf that is very green to use.
African violets are a lot like older ladies who want to try and have a baby. If they are too old they struggle to fall pregnant. African Violet leaves that are too old will sometimes produce roots but will never produce baby plants.
Preparing leaves to plant.
Once you have selected your leaves you should cut their stems to a length of 10 to 20 millimetres.
The part of the stem going into the soil should be cut at at an angle that will make the edge from which new plants will grow as wide as possible.
You can dip the leaf into a rooting hormone but with African Violets it is not really necessary. If a leaf seems to have faded drop it into water till it becomes crisp again.
Planting the leaf.
Most people drop the leaf into a glass of water at this stage and wait for roots to form. Although the leaf in a glass of water works it is not necessarily the best way to propagate a new plant. The problem with this method is that at some stage the leaf will have to be planted in soil so why not plant it in soil straight away.
You can use a normal potting soil to plant the leaf in but it might not work. If the leaf does not like the soil it will rot. The trick is to mix your potting soil with extra perlite and vermiculite or just a mixture of the two without the soil. The easiest of course is just to buy a bag of good African violet potting mix and use that when rooting your leaves.
Use a small pot which has drainage holes in its base to plant your leaves in.
Place one leaf in the centre of your container with the leaf's stem buried to a depth of about 10 millimetres. The leaf should be placed at an angle into the pot which will ensure that the angle that you have cut the leaf will be horizontal in the pot giving the leaf the most chance to root. Ensure that the soil is moist (not wet) before placing the leaf into the soil. Fill soil in around the leaf's stem and support the leaf if necessary.
There are two schools of thought for the next step.
1. Some people place their potted leaves on a window sill where they get good light and can be watered from time to time.
2. The second idea for this step is to place the pot and leaf once it has been properly watered and the excess allowed to drain away into a plastic ziploc bag. After blowing air into the bag seal it. Place the sealed bag with the plant inside in a bright location out of the way of direct sunlight. The humidity in the bag will keep the plant watered.
In both instances it will take the leaf about a month to get roots and another month to get small plantlets.
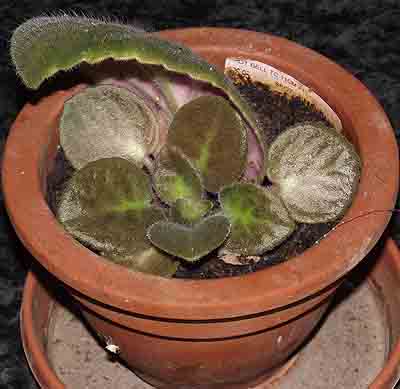
Plantlet with the leaf it grew from
Once the plantlets have formed and are about the size of the knuckle of your thumb it is time to split them up and pot them in their own pots.
To split up the plantlets you should remove the whole new plant from its pot. Once you have done this gently scrape away the soil from the roots and the plantlets should separate.
Select the plants that have a rosette of leaves to transplant. You can plant them all if you need a lot of plants but otherwise discard those you are not going to use.
The small plants should be potted into very small pots which are about 60 millimetres in diameter.
After ensuring that there are sufficient drainage holes fill the pots with the African Violet potting mix or the mix that you used to get the leaves to shoot and make a small indentation in the centre of the soil. Place you new plantlet into the indentation and gently push the soil against the roots to stabilise the plant. Water the plants and allow excess water to drain away.
You can now either place the pot and plant into a ziploc plastic bag and place it on the window sill or just place it in a spot where it will get bright light and no direct sunlight.
After a month or two the plants in the ziploc will be ready to come out. Open the seal of the bag and let the plant acclimatise for a day or two before removing it from the bag.
The plant without the bag should be watered by pouring into the overflow tray you stand the pot in. Pour water into the tray and after twenty minutes or so empty the tray and throw the excess water away.
The reason for watering the plant from below is that African violets don't like wet feet and that they breathe oxygen through their roots. If the roots are underwater they cannot breathe.
Pruning.
There are no rules as to how you should prune an African violet, rule of thumb is, if its ugly cut it off.
Flowering.
Healthy plants should flower for about nine months of the year, if the plant is ailing it will only flower for a couple of months or not at all. When this happens repot the plant in fresh soil and see how soon your plant will recover.
Happy gardening!
© 2023 Garden-tips - All Rights Reserved
African Violets
12.7.2023